Having an arch in your back can cause a lot of discomfort. An arched back, also known as hyper lordosis, puts extra strain on your spine and can lead to pain and stiffness in your lower back. The good news is there are exercises you can do at home to help improve arching in your back and relieve associated aches and pains. With a little consistency, these exercises can help strengthen your core and back muscles for better support.
Understanding Arching of the Back
Before getting into the exercises, it’s helpful to understand what causes arching of the back. There are a few potential contributors:
- Tight hip flexors – The hip flexors are muscles that let you lift your knees and bend at the waist. When they’re too tight, they overarched your lower back.
- Weak core and back muscles – Your core and back muscles help support your spine. Weakness in these areas can cause your lower back to dip into an arched position.
- Muscle imbalances – If certain muscles are much stronger than their opposing muscles, it can throw off your posture and curve your spine too far inward. Common imbalances include tight hip flexors and weak glutes or tight chest muscles and weak upper back muscles.
- Pregnancy – Carrying the weight of a baby in the front of your body shifts your center of gravity, which places extra strain on your lower back. This added weight can cause an exaggerated arch.
- High heels – Wearing high heels shifts your weight forward, which arches your lower spine. Prolonged high heel wear exacerbates this effect over time.
- Heavy lifting – Lifting heavy objects with improper form can overload your back muscles, leading them to overcompensate by arching.
- Structural factors – In some cases, an arched back is caused by structural abnormalities like scoliosis. But even structural arching can often be improved through targeted exercises.
Now that you understand why your back may be arching excessively, let’s get into some simple exercises to start improving it.
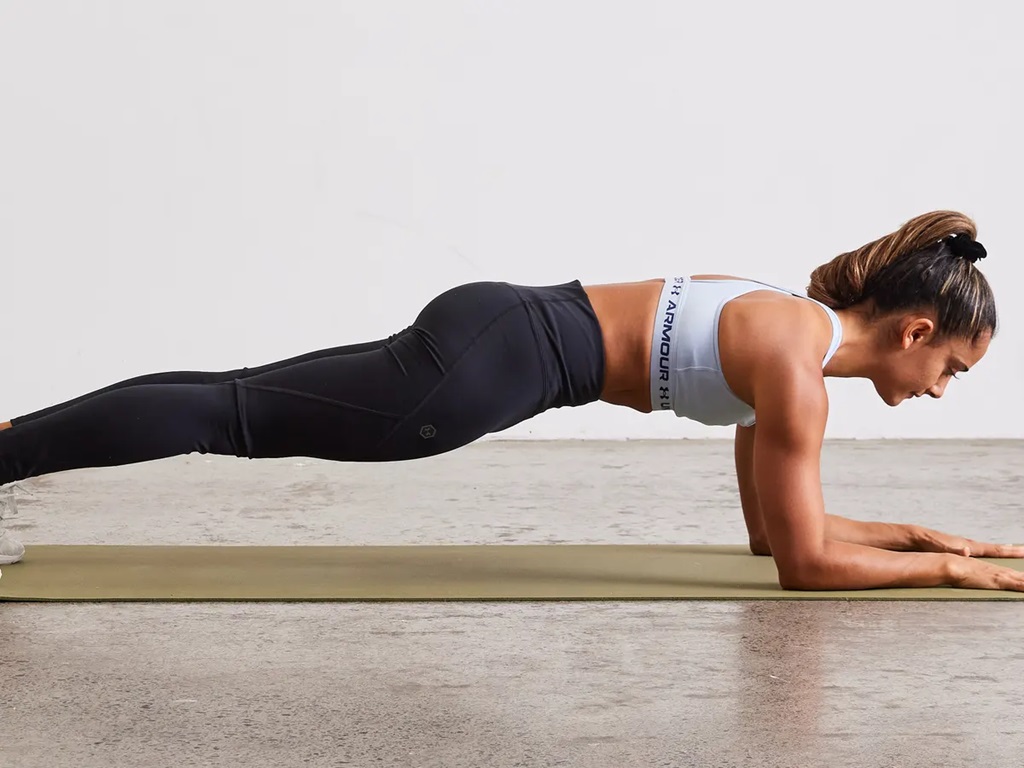
1. Plank
Planks strengthen your entire core, including your abdominal muscles, obliques, lower back, and glutes. This full-body conditioning helps stabilize your spine in a neutral position versus an overarched posture.
Here is how to do a standard plank:
- Get into a pushup position on the floor. Rest your weight on your forearms and toes. Your elbows should sit directly under your shoulders.
- Keep your body in a straight line without sagging your hips or arching your back. Engage your abdominal muscles.
- Hold this plank position for as long as you can while maintaining good form. Take breaks as needed.
- Work your way up to holding a plank for 60 seconds. Repeat 1-3 times.
You can make planks more challenging by doing them on one leg or by adding lower body movements like knee tucks. Planks with arm or leg lifts also up the difficulty.
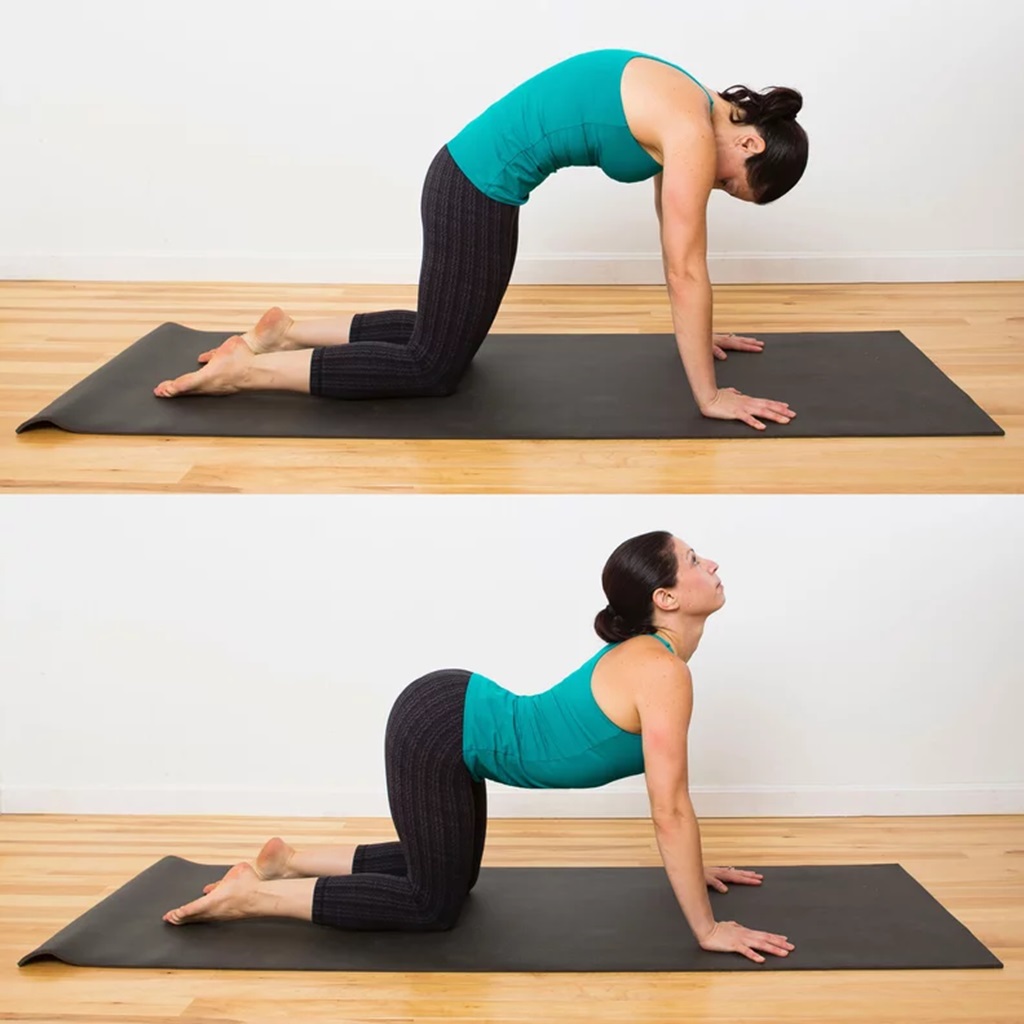
2. Cat-Cow Pose
Cat-cow is a basic yoga stretch that improves spinal flexibility and mobility through your back. Moving between the two positions stretches out your back muscles in both directions to help alleviate arching.
Here is how to do the cat-cow pose:
- Get on your hands and knees with a flat back. Your wrists should align under your shoulders and your knees under your hips.
- Inhale and arch your back, lifting your chest upwards and dropping your belly down. Lift your chin. This is the cow position.
- Exhale and round your spine toward the ceiling, pulling your belly button in. Let your head relax down. This is the cat position.
- Flow smoothly between the cat and cow positions, coordinating the movement with your breath.
- Complete 5-10 rounds, holding each position for 5 deep breaths.
Focus on feeling a full range of motion throughout your entire back during the cat-cow exercise. Move slowly and let gravity help open your spine.
3. Bridge Pose
Bridging strengthens your glutes, hamstrings, and lower back muscles. Developing strength here helps take pressure off your lower spine so you can maintain a neutral alignment.
Follow these instructions to do a bridge pose:
- Lie on your back with your knees bent and feet flat on the floor about hip-width apart. Place your arms by your sides.
- Press your heels into the floor and squeeze your glutes to lift your hips up into a bridge. Find a straight line from your knees to shoulders.
- Hold at the top for 2-3 seconds before slowly lowering back down. Keep your core engaged throughout the movement.
- Repeat for 10-15 reps. Work up to holding the bridge for 5-10 seconds.
Make sure you aren’t shrugging your shoulders or straining your neck during the exercise. The movement should come from your hips and glutes squeezing.
4. Child’s Pose
Child’s pose is a classic resting yoga pose that gently extends your back muscles. Holding this pose helps open your hips, alleviate arching, and relieve any tension or discomfort in your lower back.
Here are child’s pose instructions:
- Kneel on the floor and sink your hips back toward your heels. Point your toes behind you.
- Lower your chest between your thighs and reach your arms forward fully extended or by your sides. Let your forehead rest on the floor.
- Hold for 30 seconds to a minute while breathing deeply into your back. Relax your shoulders down.
- Repeat 2-3 times. Work the pose longer as your flexibility allows.
Child’s pose should feel like a deep, soothing stretch all along your back body. The lengthening it provides can help counteract excessive arching. Use this anytime your back feels tight or achy.
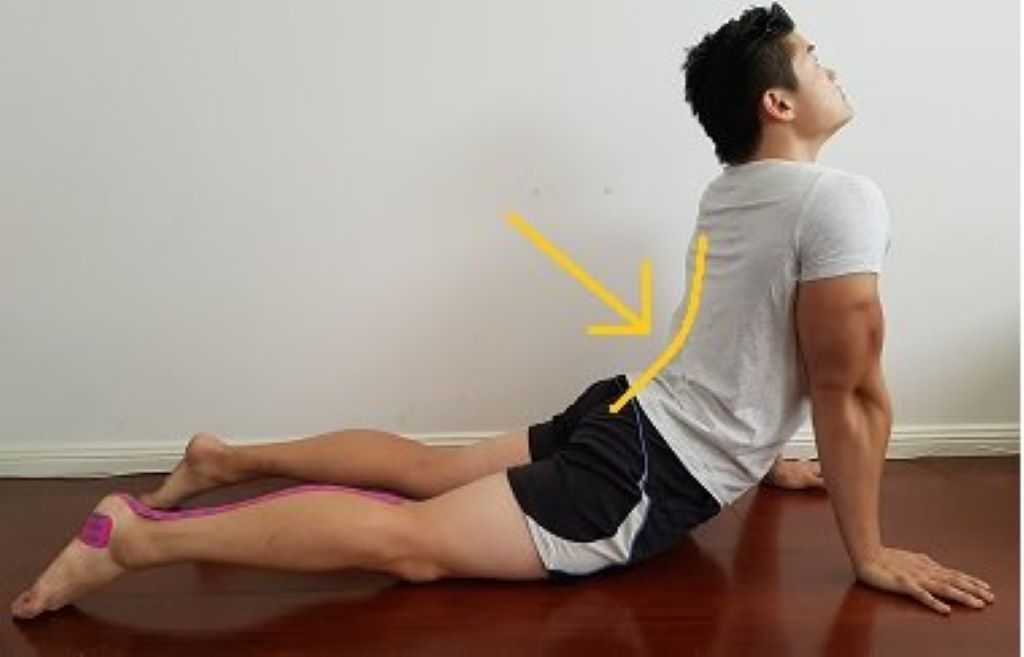
5. Kneeling Lunge Stretch
This kneeling lunge targets the hip flexors, which commonly contribute to an excessive arch in the lower back when they’re too tight. Stretching out your hip flexors can help reduce arching.
To do the kneeling lunge:
- Start in a kneeling position. Place one foot forward with your knee bent at 90 degrees. Your back knee should be on the ground.
- Contract your glutes and core to prevent your lower back from arching as you shift your hips forward.
- Lean your torso slightly over your front leg until you feel a deep stretch in the front of your back hip. Hold for 30-60 seconds.
- Switch sides and repeat with the other leg forward. Complete 2-3 stretches per side.
Focus on keeping your pelvis tilted forward to isolate the hip flexors. Avoid rounding your lower spine during the stretch.
6. Seated Spinal Twist
Rotating your spine in both directions promotes mobility and flexibility through your back. The increased range of motion can help reduce excessive arching.
Follow these tips for the seated spinal twist:
- Sit up tall on the floor with your legs crossed. Keep your back straight and core braced.
- Place your right hand behind you and your left hand across your right thigh. Twist your upper body to the right.
- Turn your head to look over your right shoulder. Hold for 30 seconds feeling an open stretch in your mid-upper back.
- Repeat on the other side, twisting to your left. Complete 2-3 sets per side.
Make sure to move slowly and keep your chest lifted during the rotation. Avoid rounding forward.
7. Bow Pose
The bow pose is an intermediate backbend that strengthens your back while also providing an invigorating backward stretch. This helps expand your spine’s range of motion to counteract arching.
Here are tips for proper bow pose form:
- Lie face down with your arms along your sides and legs hip-width apart. Bend your knees bringing your heels toward your glutes.
- Reach back to grab the outside of your ankles (or feet if flexible). Kick your feet into your hands.
- Inhale and lift your chest and thighs off the floor as you draw your heels away from your hips. Your weight should be centered on your abdomen.
- Hold for 20-30 seconds breathing deeply. Slowly lower back down and repeat 2-3 times.
Only lift to a depth that still feels comfortable in your back. Modify by not grabbing your ankles if needed.
8. Extension on Exercise Ball
This move opens your hips and extends your spine lying face down over an exercise ball. Opening up the front of your body helps balance out an excessive arch in your lower back.
Here’s how to do it:
- Lie stomach-down over a large exercise ball. Walk your hands out so your hips drape over the ball while your hands rest on the floor for support.
- Allow your back to relax into a gently arched position over the ball. Keep your neck in line with your back.
- Hold this extended position for 30-60 seconds breathing deeply.
- Very carefully extend one leg long behind you, squeezing your glutes. Hold for 10 seconds before switching legs.
Go slowly and maintain stability as you extend your leg back. Only lower to a depth that continues feeling comfortable in your back.
9. Superman
The superman exercise strengthens your lower back and gluteal muscles to improve spinal alignment. Developing endurance here helps prevent your lower back from arching into an extension.
Follow these superman instructions:
- Lie face down with arms and legs extended, keeping a slight bend in your elbows and knees.
- Inhale to raise your arms, legs, chest, and thighs up off the floor. Reach your hands and feet in opposite directions.
- Keep your gaze down and core engaged. Hold for 2-3 seconds.
- Exhale to lower back down. Repeat 10-15 times.
Work on gradually keeping your limbs lifted longer. But avoid overarching your lower back at any point.
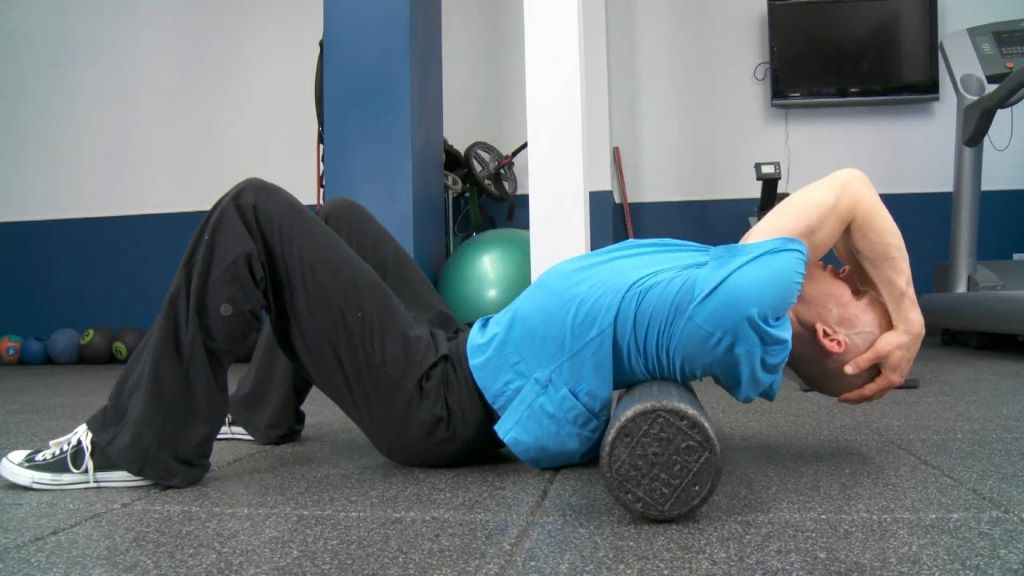
10. Upper Back Opener on Foam Roller
Opening up tightness in your chest and front shoulders can help counteract an arched lower back. This foam roller move targets your upper back muscles to relieve tension.
To do this exercise:
- Sit upright on a foam roller with it positioned horizontally under your upper back, below your shoulder blades.
- Extend your arms out to the sides or behind your head. Relax your shoulders down.
- Slowly roll back and forth over the foam roller massaging your upper back muscles. Apply more pressure to any tender spots.
- Roll for 2-3 minutes breathing deeply. Focus on relaxing your muscles into the roller.
Make sure to keep good posture during this move and avoid rounding your lower back.
Sample Back Arch Exercise Routine
Try this sample routine 3 times a week to reduce arching and strengthen your back:
- Plank – 3 reps of 30 seconds
- Cat-cow – 8 cycles
- Bridge – 12 reps
- Seated spinal twist – 2 reps x 30 seconds each side
- Kneeling hip flexor stretch – 3 reps x 45 seconds each side
- Superman – 12 reps
- Child’s pose – 2 reps x 1 minute
- Foam roll upper back – 5 minutes
Focus on proper form during each exercise. Listen to your body, easing up on any moves that cause discomfort. Stick with this routine consistently for 4-6 weeks to see improvement.
Lifestyle Tips for Better Back Alignment
Along with targeted exercises, your daily habits impact your back health. Here are some tips to complement your arch-reducing workout routine:
- Maintain good posture – Sit and stand tall keeping your ears, shoulders, hips, knees, and ankles aligned. Avoid slouching.
- Watch your walking gait – Walk with your chin parallel to the ground, abdomen engaged, and weight in your heels.
- Wear supportive shoes – Flip flops, high heels, and unsupportive flats strain your back. Opt for well-cushioned sneakers or shoes with arch in your back support.
- Stretch your hip flexors – Gentle stretches 2-3 times a day keep these muscles flexible for better alignment.
- Strengthen your core – Do planks, bridges, and other core moves to stabilize your spine.
- Mind your movement patterns – Pick items up with bent knees, pivot versus twist your torso, and avoid bent-over positions like crunches.
With consistency, these tips combined with a targeted exercise routine can help you improve posture, alleviate aches, and reduce an arch in your back over time. But be sure to check with your doctor regarding any persistent or worsening back pain.
Frequently Asked Questions
What causes an excessive arch in your back in the lower back?
Common causes include tight hip flexors, weak core and glutes, muscular imbalances, pregnancy, high heel wear, heavy lifting, and structural factors like scoliosis.
Does arching of the back require surgery?
Most cases of back arching can be improved through targeted exercises, lifestyle changes, and physical therapy. Surgery may be needed in rare instances of severe or worsening structural abnormalities.
Which exercises are best for improving an arched back?
Some of the best exercises include planks, cat-cows, bridges, child’s pose, kneeling hip flexor stretches, superman’s, and upper back foam rolling.
How long does it take to reverse an arched back?
With consistency, you can start feeling subtle improvements within 2-4 weeks. But it takes about 3-6 months of regular exercise to see major posture changes and relief of back arching.
Should you avoid lower back stretches if you have an arched back?
Gentle back stretches like child’s pose are okay. But avoid intense backbend stretches like wheel pose or bending backwards over objects, which can worsen arching. Focus on opening your hips and mid-upper back instead.
Conclusion
An arched back can cause discomfort, but targeted exercises make a difference. Stick with a routine of core-strengthening moves like planks along with hip and upper back openers. Be patient and focus on proper form. Find out how long to skip rope for weight loss and learn about back-friendly exercises combined with lifestyle changes to fix an arch in your back.